If a switch is damaged, or you just want to update your fittings, it is a fairly simple job to replace it. Just make sure you write down exactly how the old switch was connected before you disconnect it, and connect the new switch in the same way. If a switch is damaged, or you just want to update your fittings, it is a fairly simple job to replace it. Just make sure you write down exactly how the old switch was connected before you disconnect it, and connect the new switch in the same way.
Never take risks with electrical safety
Before you start any type of electrical work, you must follow these following safety precautions:
- Turn off the main switch and remove the circuit fuse that you intend to work on.
- Then turn on the main switch again to restore power to the rest of the house.
- Keep the fuse in your pocket to avoid accidental replacement or switch off the circuit breaker (MCB) for the circuit you will be working on andlock it off using a locking device.
- Check the circuit is dead with a socket tester or voltage tester/meter for lighting circuits. These will confirm whether circuits are dead and safe to work on.
- Check all finished work with a socket tester (or voltage tester for lighting circuits) before using.
For your safety, these products must be installed in accordance with local Building Regulations. If in any doubt, or where required by the law, consult a competent person who is registered with an electrical certification scheme. Further information is available online or from your local authority.
Be careful when opening up multi-gang switches
The lights that multi-gang switches control should take power from the same circuit. But in some cases the lights could be split on two circuits i.e. upstairs lights and downstairs lights. If yours is like this, take care, as you will have live cables at each switch position, In this case you will have to isolate the other circuit as well. When one circuit is isolated, there is more than one method of wiring multi-way light switches.
Safety First - Earthing Light Switches
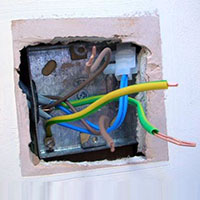
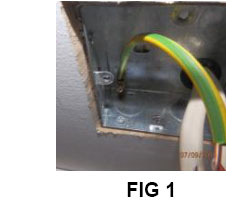 Fig 1 The most common light switch combination is a metal mounting box andplastic faceplate. In this case, the earth core/s must be connected to the earthing terminal of the mounting box. If you have a metal faceplate, the main earth core runs to the faceplate first (fig1). You'll then need to run a short length of earth core (cut from 1mm2 two-core and earth cable, and insulated with green/yellow sleeving) between the earthing terminals on the faceplate and the mounting box. If both your mounting box and faceplate are plastic and there's no earthing terminal, run green/yellow sleeving over the bare cores and leave 3mm of the cable unsheathed. Put the exposed ends into a connector block. By doing this the earth continuity is maintained through the lighting circuit. By following these instructions below should enable you to achieve a successful outcome. Fig 1 The most common light switch combination is a metal mounting box andplastic faceplate. In this case, the earth core/s must be connected to the earthing terminal of the mounting box. If you have a metal faceplate, the main earth core runs to the faceplate first (fig1). You'll then need to run a short length of earth core (cut from 1mm2 two-core and earth cable, and insulated with green/yellow sleeving) between the earthing terminals on the faceplate and the mounting box. If both your mounting box and faceplate are plastic and there's no earthing terminal, run green/yellow sleeving over the bare cores and leave 3mm of the cable unsheathed. Put the exposed ends into a connector block. By doing this the earth continuity is maintained through the lighting circuit. By following these instructions below should enable you to achieve a successful outcome.
- Isolate the circuit and confirm that the power is off with a voltage tester. Then unscrew the switch faceplate and pull it forward so you can see the connections behind.
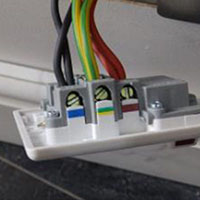
- Write down the colour and the terminal numbers, or sketch a clear diagram showing the colour and number of wires connected to each terminal.
- Release the terminal screws and pull the cores from the terminals.
- If the earth core is properly insulated in green/yellow sleeving and connected to the mounting box, leave this attached.
- Connect the cores to the correct terminals of the new switch, and tighten the screws. Check that they're clamping the cable cores firmly by giving the wires a slight tug. If there isn't one already, fit a length of brown PVC sleeving over the blue core (or the black core if your wiringis in the old colours) to show it can be live.
- Run green/yellow PVC sleeving over the bare earth core of the switch drop cable.
- Connect it to the earthing terminal of the mounting box. If you're using a metal switch, make sure you earth the switch faceplate.
- Check again that each connection is secure, then push the cable back into the mounting box and fit the faceplate.
Electrical Safety
Electrical safety is extremely important and it is essential that you know exactly what you are doing. CLICK HERE TO READ MORE>> |